Having trouble recording a clear shot of a phone or computer screen with a camera? Try replacing the screen in After Effects with this simple method.
A problem that many people have run into when trying to record a phone or computer screen is not getting a clear shot of the contents on the screen. There are reflections, bad angles, and other things that make your screen unclear. When you work with screen replacements, that problem goes away, and it gives you the freedom to change up what’s on the screen in post. Here, we are going to show you some very simple methods for pulling off a screen replacement in both After Effects and Premiere. Let’s get started!
Tips for Recording Footage for Screen Replacements

To make your life easier at the editing desk, do the following to prepare the footage for an easy screen replacement:
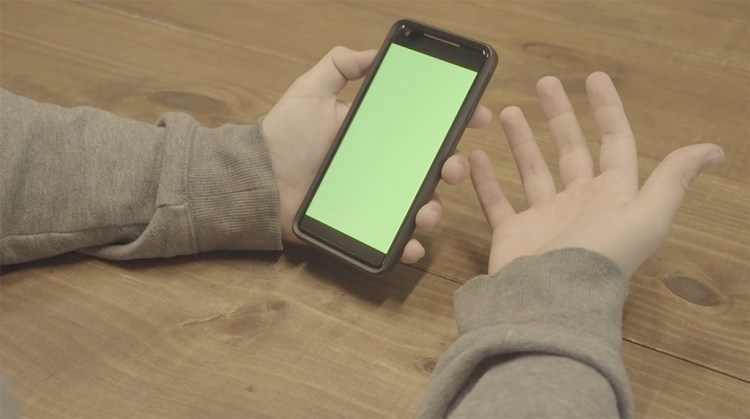
- Record your screen with a “green screen” — download a green .jpg from the internet, and open it in your photo app. Make it full screen, and use that when recording the device. This will come in handy when keying out the screen in post, and it will allow you to move objects over the screen without disrupting the screen replacement.
- Keep all 4 corners visible — When you get to the motion tracking portion of this tutorial, keeping all four corners of your device visible will be paramount for capturing a perfect motion track.
Working in After Effects

To get started, open up a new composition and import all of your footage. The first thing that you want to do is track the motion of your device’s screen. Open up the tracker window, and click the Track Motion button. Make the motion source your video, and change the track type to Perspective Corner Pin. This will prompt a four-corner box to open up in your preview window. Match those pins to the corners of your device’s screen and then click Analyze to enable AE’s motion tracking software.

Before you analyze the track, though, you’re going to need something to place the tracking onto in lieu of your vertical video (for later placement). Create a solid object by right-clicking the timeline and selecting New > Solid. No need to resize this object — just make it a visible color such as bright red, and from the tracker tab, select that solid in the Edit Target options. Once targeted, the new solid layer will take the shape of the tracked screen.

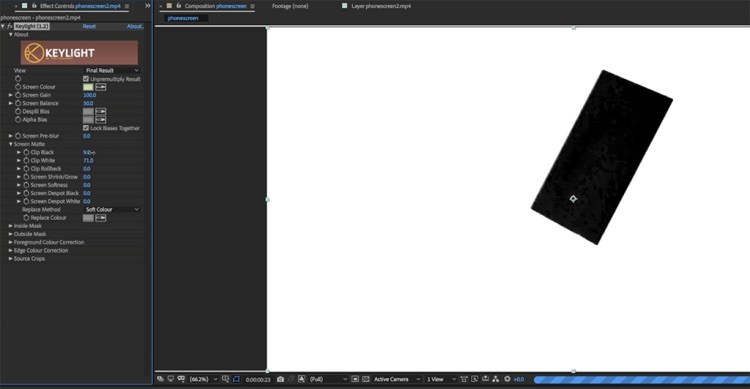
Now, it’s time to key out the green screen to allow movement over your device. Start by going to Effects > Keying > Keylight. Once you’ve applied this to your video clip, take the dropper in the effects tab and click the green screen. To make the keying process a bit clearer, change your view settings to Alpha Channel so the color difference is more apparent. Toy with the settings until you get a clear distinction between your key and the rest of the video.
The keying process is going to alter the color of your video, so to bring it back to normal, duplicate your clip and delete the keylight effect on the bottom layer. Afterward, go to your Track Matte settings on your timeline and Alpha Matte your bottom clip to the one above it. This will keep the color keyed, while maintaining the original color of your video.

Since you’re almost finished up, it’s time to add your vertical video to your phone. Pre-compose your red solid by right-clicking it and selecting Pre-Compose. this will open up a new composition with just your red solid. Once in that window, drag in your vertical video and stretch it to the corners of the red solid. It may look warped, but it will go back to its original size in the main composition. And just like that, you’ve successfully created a screen replacement!
Screen Replacements in Premiere

Now while my official doctor’s orders are to direct you to do screen replacements in After Effects, they can be done in Premiere as well. A caveat, though: the screen has to be completely still. If the screen moves, you are in for hours of keying in Premiere (And no one wants that).
So take a clip of a screen shot on a tripod and import it into Premiere. Take the clip you would like to insert into the original screen and add it over the other in your timeline. Shrink it down in the settings to just about the size of your device’s screen. Then go to the Effects tab and drop Corner Pin onto your top video. This will allow you to manipulate the corners of your new video, so now all you have to do is pin those to the corners of the device’s screen. And . . . that’s it! Really. That simple.
Looking for more video production tutorials? Check these out.
- How to Make a Roger Deakins Ring Light for Under $150
- 4 Iconic Music Video Effects You Need to Know
- How to Animate Text in Premiere Pro’s Essential Graphics Panel
- How To Create Your Own Foley + 40 Free Sound Effects
- How To Shoot Product Shots: 3 Cheap And Easy Setups


